
LCD1602+Keypad Shield สำหรับบอร์ด Arduino


รายละเอียดสินค้า
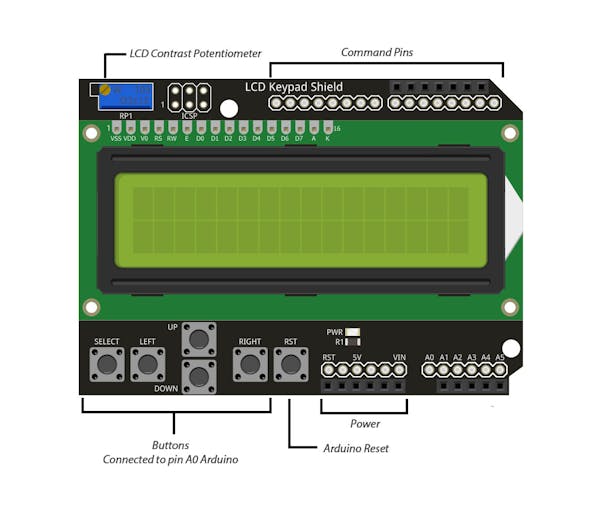
LCD1602 + Keypad Shield สำหรับบอร์ด Arduino เป็นจอแสดงผล LCD ขนาด 16 ตัวอักษร 2 บรรทัด พร้อมปุ่มกด สามารถใช้ป้อนค่าปุ่มที่กดให้กับ Arduino เอาไปควบคุมจัดการข้อมูลต่าง ๆ ที่ต้องการได้อย่างสะดวก ไม่ต้องต่อสายเพิ่ม แค่ต่อก็พร้อมใช้งาน เหมาะสำหรับงานแสดงผลข้อมูลออกจอ LCD ที่ต้องการรับค่าปุ่มจากผู้ใช้ไปประมวลผล
Displaying information in electronic projects has always been the most compelling issue. There are various ways to display data. These screens can be so simple such as 7segments or LEDs, or they can be more fascinating such as LCDs. Using LCDs has always been one of the most popular ways to display information. LCDs are divided into two generic types: Characters and Graphics.
One of the most common, cheapest and simplest LCDs available is the character LCD. This LCD consists of several rows and columns. Letters and numbers are written in places created by rows and columns. For example, LCD character 16*2 has 2 rows and 16 columns. So it can display 32 characters.
Working with these LCDs is very simple and they have full compatibility with all microcontrollers and processor boards. For easier use of these LCDs, its 16x2model, including four keys for making the menu, is made as a Shield which is also compatible with Arduino boards.
How to Use Arduino LCD Keypad Shield
Arduino shiels is a user-friendly and simple shield. To use it you need to know its pinout and its connection to Arduino at first.

How to Read the Keys?
In this shield, all 4 keys are connected to the analog pin 0 to save on digital pins. So we should use ADC to read them. When you press a key, it returns a value to the A0 pin according to the internal resistive splitting circuit, which identifies the type of the key.

/*
Arduino 2x16 LCD - Detect Buttons
modified on 18 Feb 2019
by Saeed Hosseini @ Electropeak
https://electropeak.com/learn/
*/
#include <LiquidCrystal.h>
//LCD pin to Arduino
const int pin_RS = 8;
const int pin_EN = 9;
const int pin_d4 = 4;
const int pin_d5 = 5;
const int pin_d6 = 6;
const int pin_d7 = 7;
const int pin_BL = 10;
LiquidCrystal lcd( pin_RS, pin_EN, pin_d4, pin_d5, pin_d6, pin_d7);
void setup() {
lcd.begin(16, 2);
lcd.setCursor(0,0);
lcd.print("Electropeak.com");
lcd.setCursor(0,1);
lcd.print("Press Key:");
}
void loop() {
int x;
x = analogRead (0);
lcd.setCursor(10,1);
if (x < 60) {
lcd.print ("Right ");
}
else if (x < 200) {
lcd.print ("Up ");
}
else if (x < 400){
lcd.print ("Down ");
}
else if (x < 600){
lcd.print ("Left ");
}
else if (x < 800){
LCD.print ("Select");
}
}
Let’s take a deeper look at the code:
#include <LiquidCrystal.h>
The library you need for character LCD.
LiquidCrystal LCD( pin_RS, pin_EN, pin_d4, pin_d5, pin_d6, pin_d7);
Defining the LCD object according to the pins that are connected to Arduino.
lcd.begin(16, 2);
Initial configuration of the LCD by specifying the number of columns and rows. The first argument is the number of columns, and the second is the number of rows.
Here are some of the important functions to work with LCD:

How to Scroll a Text?
We can do it easily using the above functions.
/*
Arduino 2x16 LCD - LCD Scroll
modified on 18 Feb 2019
by Saeed Hosseini
https://electropeak.com/learn/
*/
#include
const int RS = 8;
const int EN = 9;
const int d4 = 4;
const int d5 = 5;
const int d6 = 6;
const int d7 = 7;
const int pin_BL = 10; // arduino pin wired to LCD backlight circuit
LiquidCrystal lcd( RS, EN, d4, d5, d6, d7);
void setup() {
lcd.begin(16, 2);
lcd.print("Electropeak");
delay(1000);
}
void loop() {
// scroll 11 positions ("Electropeak" length) to the left
for (int positionCounter = 0; positionCounter < 11; positionCounter++) {
lcd.scrollDisplayLeft();
delay(400); //Scrolling speed
}
// scroll 27 positions ("Electropeak" length + display length) to the right
for (int positionCounter = 0; positionCounter < 27; positionCounter++) {
lcd.scrollDisplayRight();
delay(400);
}
// scroll 16 positions (display length) to the left
for (int positionCounter = 0; positionCounter < 16; positionCounter++) {
lcd.scrollDisplayLeft();
delay(50);
}
delay(1000);
}
How to Display a Specific Character?
You can create a character in each block from your LCD. To do this, you should convert your desired character to an array of codes, then display it on LCD. To convert your character to codes you can use online websites like this. Design your character, then copy the generated array to your code.


/*
Arduino 2x16 LCD - LCD Special Char
modified on 18 Feb 2019
by Saeed Hosseini
https://electropeak.com/learn/
*/
#include
const int RS = 8;
const int EN = 9;
const int d4 = 4;
const int d5 = 5;
const int d6 = 6;
const int d7 = 7;
const int pin_BL = 10; // arduino pin wired to LCD backlight circuit
LiquidCrystal lcd( RS, EN, d4, d5, d6, d7);
// smily face
byte smiley[8] = {
B00000,
B10001,
B00000,
B00000,
B10001,
B01110,
B00000,
};
// Battery sign
byte battery[] = {
B01110,
B01010,
B11011,
B10001,
B11111,
B11111,
B11111,
B11111
};
// arrow right
byte R_arrow[8] = {
B00000,
B00100,
B00010,
B11111,
B00010,
B00100,
B00000,
B00000
};
// arrow left
byte L_arrow[8] = {
B00000,
B00100,
B01000,
B11111,
B01000,
B00100,
B00000,
B00000
};
// Ohm sign
byte ohm[8] = {
B00000,
B01110,
B10001,
B10001,
B10001,
B01010,
B11011,
B00000
};
// Heart
byte heart[8] = {
B00000,
B01010,
B10101,
B10001,
B10001,
B01010,
B00100,
B00000
};
int i = 0;
void setup() {
lcd.begin(16, 2);
lcd.createChar(0, smiley);
lcd.createChar(1, battery);
lcd.createChar(2, R_arrow);
lcd.createChar(3, L_arrow);
lcd.createChar(4, ohm);
lcd.createChar(5, heart);
lcd.createChar(6, ohm);
for (int n = 0; n < 6; n++)
{
lcd.setCursor(n * 2, 0);
lcd.write(n);
}
}
void loop() {
}
lcd.createChar stores your array in a memory location and you can display it withlcd.write
What's Next?
- Try to create a menu with ability of selecting options.
CODE
code 1Arduino
/*
Arduino 2x16 LCD - Detect Buttons
modified on 18 Feb 2019
by Saeed Hosseini @ Electropeak
https://electropeak.com/learn/
*/

#include <LiquidCrystal.h>

//LCD pin to Arduino
const int pin_RS = 8;
const int pin_EN = 9;
const int pin_d4 = 4;
const int pin_d5 = 5;
const int pin_d6 = 6;
const int pin_d7 = 7;

const int pin_BL = 10;

LiquidCrystal lcd( pin_RS, pin_EN, pin_d4, pin_d5, pin_d6, pin_d7);

void setup() {

 lcd.begin(16, 2);

 lcd.setCursor(0,0);

 lcd.print("Electropeak.com");
 lcd.setCursor(0,1);
 lcd.print("Press Key:");
}

void loop() {
 int x;
 x = analogRead (0);
 lcd.setCursor(10,1);
 if (x < 60) {
 lcd.print ("Right ");
 }
 else if (x < 200) {
 lcd.print ("Up ");
 }
 else if (x < 400){
 lcd.print ("Down ");
 }
 else if (x < 600){
 lcd.print ("Left ");
 }
 else if (x < 800){
 LCD.print ("Select");
 }
}
วิธีการสั่งซื้อสินค้า
วิธีการชำระเงิน
ราคาสินค้าหน้าเว็บรวมภาษีแล้ว
ค่าจัดส่งสินค้า ยอดสั่งซื้อต่ำกว่า 1000 บาท ค่าจัดส่งทาง EMS 50 บาท
ยอดสั่งซื้อ 1500 บาทขึ้นไป จัดส่งให้ฟรีทาง Kerry
(ไม่รวมสินค้าหมวดหมู่DIY)
หลังจากสั่งซื้อและชำระเงินแล้ว จะต้องแจ้งชำระเงินทางหน้าเว็บเท่านั้น หากไม่มีการแจ้งชำระเงินภายใน 72 ชม. ระบบจะยกเลิกคำสั่งซื้อโดยอัตโนมัติ หากท่านยังต้องการสั่งซื้อสินค้าอยู่ จะต้องทำการสั่งซื้อใหม่อีกครั้ง
รายการที่แจ้งชำระเงินก่อนเวลา 15:00น. จะทำการจัดส่งในวันทำการเดียวกัน รายการที่แจ้งชำระเงินหลัง 15:00น. จะจัดส่งในวันทำการถัดไป จะทำการจัดส่งทุกวัน จันทร์-ศุกร์
***เฉพาะบริการจัดส่งKerryแจ้งยอดชำระก่อนเวลา10:30น. จะจัดส่งในวันทำการเดียวกัน
Kerryจัดส่งวันจันทร์-ศุกร์เท่านั้น
*เฉพาะวันเสาร์ รายการที่แจ้งชำระเงินก่อนเวลา 10:00น. จะทำการจัดส่งในวันทำการเดียวกัน รายการที่แจ้งชำระเงินหลัง 10:00น. จะจัดส่งในวันทำการถัดไป
หลังจากชำระเงินแล้ว คลิ๊กที่นี่ เพิ่อแจ้งชำระเงินทันที หากไม่สะดวกในการแนบหลักฐานการโอนเงิน กรุณาแจ้งชื่อธนาคาร และเวลาโอนเงินที่ถูกต้อง หากไม่สะดวกในการเข้าหน้าเว็บจริงๆ สามารถส่งหลักฐานการโอนเงินมาได้ทาง Official Line ID : @analogread

2.ชำระเงินผ่าน QR-CODE ฟรีค่าธรรมเนียม ทุกกรณี
...เลือกธนาคารที่แจ้งชำระเงินเป็น >>>>>>พร้อมเพย์<<<<<< หากมีค่าธรรมเนียมเกิดขึ้นทางเราจะใส่กลับคืนไปในกล่องพร้อมกับสินค้า

1. ชำระเงินผ่านร้านค้าโดยตรง
เลือกช่องทางที่คุณสะดวก เพื่อชำระเงินให้ร้านค้าโดยตรง หากมีข้อสงสัย กรุณา ติดต่อเรา

- ค่าธรรมเนียม 3.9% + 11 THB
- การชำระผ่าน PayPal คุณไม่จำเป็นต้องแจ้งชำระเงิน เนื่องจากระบบจะจัดการให้คุณทันที ที่คุณชำระเงินเสร็จสมบูรณ์
2. ชำระเงินออนไลน์ผ่าน 
เลือกช่องทางที่คุณสะดวก เมื่อชำระเงินเรียบร้อย คุณจะได้รับอีเมลยืนยันการชำระเงินทุกครั้ง (LnwPay ไม่มีค่าธรรมเนียมเพิ่มเติม อ่านรายละเอียด)


หมายเหตุ: สำหรับการชำระด้วยบัตรเดบิต (Debit Card) จำเป็นต้องสมัครใช้บริการจากธนาคารก่อนชำระเงิน ดูวิธีสมัคร ธ.กสิกร | ธ.กรุงเทพ | ธ.กรุงไทย


นโยบายการเปลี่ยนหรือคืนสินค้า
เช็คสถานะสินค้า


ระบบสมาชิก

COMMENTS